
Here is the template, if you'd rather just use it.
************
If you've searched and searched for an out of the box solution to deploying Click Once applications using Team Build 2010 you are in for some disappointment. There isn't one.
However, here are 5 easy steps to get this working. There are multiple ways to achieving a workable solution, have in mind that this solution worked for me, but might ultimately not help you. YMMV
The default build template works something like this.
It downloads the source code from the TFS server into a local agent workspace. It then executes a build using msbuild.
The solution I came up with introduces an extra step between download and compile to introduce configuration management (Production config file vs Test config file, etc). I also hijacked the compile sources step and induced msbuild to publish the click once app. So it will look something like this. The following blog post will come in really handy http://www.ewaldhofman.nl/post/2010/04/20/Customize-Team-Build-2010-e28093-Part-1-Introduction.aspx
Pre-requisites
Install a codesign certificate under the local profile of you build service account.
Step 1 New Template
Create a copy of the default build template. I called mine ClickOnceDeploymentTemplate.xaml.
The default build template is checked into your source control repository under
$[Team Project]\BuildProcessTemplates\DefaultTemplate.xaml
After you've created a new template don't forget to check it in. Let us verify that it works by using it in one of our own build definitions.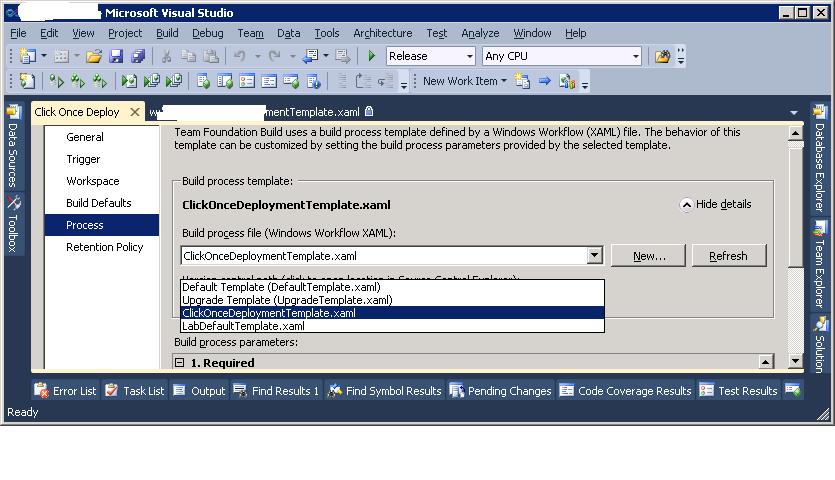 Step 2 Add some parameters
I followed Part 2 of the blog post series linked above and added a couple of new parameters to support what I had in mind.
PublishDir : This is the unc path to the location where you want to publish the app
PublishUrl: This is the url the .application file will use for the install/update fields
SourceConfigFile: Version control path of app.config file you want to replace for deployment
DeployConfigFile: UNC path to the app.config file you will use for deployment
ManifestCertificateThumbprint: This is the sha1 hashcode of the codesign certificate that is locally installed under build service account profile.
You can verify the parameters by refreshing the build definition you saved.


Step 3 lets find the config file we want to replace
Locate the "Get Workspace"activity. This activity is responsible for downloading the source code from the version control repository. It is located under:
Process > Sequence > Run On Agent > Initialize Workspace
a) We need to add a variable named LocalConfigFile. This variable will hold the file path to the local app config file on the build server.
b) We will also add a ConvertWorkspaceItem activity. This new activity will convert our version control path to the config file specified in our SourceConfigFile argument to a local workspace path held by the LocalConfigFile variable.
Step 4 lets replace it
We will need to add an invoke process activity to replace the app config file from our DeployConfigFile argument. To the location pointed by our LocalConfigFile variable.
Step 5 Publish
We will hijack the compile step of the template to tell msbuild to publish and sign the click once app. To do this we must first locate the "Run MSBuild for Project" MSBuild activity. It is the last activity before the tests are run. The path is too long to even try and write out. We will edit the CommandLineArguments property of this activity. We will replace its contents with the following:
String.Format("/p:SkipInvalidConfigurations=true {0} /Target:Publish /property:PublishDir={1} /property:PublishUrl={2} /property:InstallUrl={2} /property:SignManifests=true /property:ManifestCertificateThumbprint={3}", MSBuildArguments, PublishDir, PublishUrl, ManifestCertificateThumbprint)

What we are essensially doing is telling msbuild to go ahead and publish the app to the specified publish directory and sign it with the selected certificate. Save this template and you are done.

8 comments:
publish.htm not found.
Thanks for this great article. Just a question (for a newbie) : How to link with the ManifestCertificateThumbprint ?
Great post thanks!! Worked like a charm. Only thing was that my template didnt have Write Out Local Config path, and the article doesnt seem to mention that step. I just opened your template at the top of the article and went from there.
Thanks, you saved me tons of time!
for me also Publish.htm is not being copied to the destination folder..
Really cool article. I'll use it as a found base for a bigger team build customization. Thanks
Was it actually necessary to hard-code your deployment arguments into the CommandLineArguments field? I realize you had some placeholders to account for, but I'm curious if those couldn't those be entered in the Process > Advanced > MSBuild Arguments field?
Hey,
publish.htm not found for me either.
Pls help.
Thanks
Tried this but my Publish.htm is not being copied to my folder. It might be somewhere else I am guessing. Anyways, thanks for the article.
Post a Comment